
Up in the Air
Zany Open World
Game Designer / Producer
ENGINE: Unreal Engine 4
PLATFORM: PC, Playstation 4
DEV TIME: 6 Months
TEAM SIZE: 13 People


Download Exe
GAme Design Document


Mind Map
Jump To Subsection
Game Design
Design Pillars
When setting out to codify Up in the Air's pillars, I had three goals:
1) Create pillars that captured what was engaging about our prototypes.
2) Ensure that the pillars were specific and actionable, that the team could actually use them as a litmus test when making design decisions.
3) Get the team's buy-in by getting their input and feedback
To achieve these goals, I decided that the pillars should answer four questions: What experience should the player to have? How does the player interact with the game world? How is the game be structured? What style does the game have, visually and otherwise?
The answer to these four question became our four pillars, Pure Comedy, Exaggerated Balloon Physics, Open Gameplay, and Cartoon Hijinks. Once I had fleshed these pillars out, I brought them to the whole team in a brief meeting and asked for their feedback. I modified my descriptions of the pillars slightly in response to clarifying questions, and then added the final pillars to the Game Design Document.
Game Overview and Pillars Page in Game Design Document
In addition, I wrote out and posted our pillars on a large piece of piece of paper on the front wall of our team work-space and the team and I consistently referenced our pillars during design discussions throughout Production. This helped us stay on track with our original vision and avoid design pitfalls.
For instance, around the end of the Proof of Concept milestone, we redesigned how the player was introduced to power-ups in response to feedback that player's felt overwhelmed by the number of options they had when they started the game. At first, we considered making power-up unlocking a more linear experience, where the player would be required to unlock each power-up before advancing to the next region. We were able to reject this solution quickly because it violated our Open Gameplay pillar. We ultimately settled on having power-ups unlocked with tickets in any order the player chooses, as this fit our pillars better while still achieving our original design goal of not overwhelming the player.

Pillars sheet on our front wall
Zoos and Movement BaseLines
Throughout production, I was responsible for testing and documenting baseline movement, power-up, and physics values to be used by programmers and designers. I created a Zoo level specifically for this purpose. This Zoo contains all power-ups, boxes demonstrating jump heights and distances, children, physics objects, and a "driving range" for testing the launch distance of physics objects with different power-ups at different weights.
 Value Zoo OverviewBirds-eye view of the movement values zoo. |  Physics Value Firing RangeFiring range for testing appropriate force values for power ups and weight values for props. Each color is 2048 Unreal units. |  Base Movement BillboardA billboard showing the base movement values pulled from the game's current data tables, as well as the standard jump height for meshes. |
|---|---|---|
 Top Down ViewTop down view of the value zoo, including the firing range. |  Power Up BillboardsBillboards listing power up values, pulled from the current datatable. | 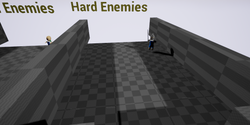 Enemy Testing ArenaA small, enclosed area for testing enemy movement speed and AI. |
After testing various values for basic movement, power-ups, and physics (based on predetermined asset time and our target travel time), I input the desired values into an in-game data table and documented them in the appropriate section of the Game Design Document.
 Movement Datatable |  Power Up Datatable |
|---|
Game Overview and Pillars Page in Game Design Document
Gameplay Bites and arenas
While Up in the Air clearly shares some of the sandbox features of other games, such as Goat Simulator, the team was adamant that our game should set itself apart by having more explicit and structured gameplay challenges. Initially, the level design team and I planned to provide this structure by having challenge tents the player could find in the open world which would take them to a separate level where they would have to complete a linear challenge.
This initial idea eventually proved unfeasible, as designing and producing these separate levels would take more time than our compressed schedule would allow. Nevertheless, the team still wanted structured gameplay throughout the world. Thus, the Arena and Gameplay Bite systems were created. Arenas take the place of the cut challenge tents, but would exist in the open world and be focused around a single task, rather than being a mini-level, while still giving a large reward. Gameplay Bites, on the other hand, are smaller bits of gameplay that can be reused in multiple environments and would provide a smaller reward.
Our first pass Gameplay Bites were basic and elemental. They were based around gameplay challenges we had already created, such as knocking over bottles or putting a child in a jail cell.
Basic Gameplay Bite Documentation
Thing in a Thing Basic Gameplay Bite
While the Arena system worked well from the start, the initial Gameplay Bites were relatively shallow and wouldn't hold the player's interest as long as we hoped. To address this problem, I brainstormed a set of advanced Gameplay Bites with the Level Design Team. I asked that each advanced Bite test at least one player skill, such as jumping, running, or the use of a power-up. Once the Level Designers and I had designed a handful of advanced Bites, we rapidly prototyped and tested these ideas, passing on only the most interesting bites to be finished by the Programming and Art disciplines. These advanced bites include Hopscotch, Golf, and Ring Race. Afterwords, the Level Designers and I began using the preexisting terrain of the game to implement interesting gameplay scenarios using these advanced bites.
3 cups
Blueberries
3 cups
Flour
1½ cups
Butter
Hopscotch Across a River
3 cups
Blueberries
3 cups
Flour
1½ cups
Butter
Golf Through a Park
3 cups
Blueberries
3 cups
Flour
1½ cups
Butter
Cannon Arena
3 cups
Blueberries
3 cups
Flour
1½ cups
Butter
Bouncy Arena
Currencies and Rewards
One major challenge the team faced was how to reward and motivate the player. Typically, open-world and sandbox games reward the player with additional content. Unfortunately, with an already compressed development schedule, we knew we needed an elegant, efficient reward structure to motivate the player. To this end, I designed a two currency system. The player can collect the two currencies, Coins and Tickets, and use them at shops scattered across the game world to purchase rewards.
Currency Documentation
Coins are the more common type of currency. Since they only buy temporary and disposable props, such as boxes that can be stacked or hot dogs that can distract children, Level Designers can place them liberally throughout the map, to reward the player for finding a special area or to guide the player in the same way small health packs guide the player in Quake.

Using Coins to Guide the Player

Using Coins as a Mini Reward and Joke
Tickets are a more rare currency that can only be acquired by completing Gameplay Bites or Arenas. There is a limited number of tickets in the game world and each can only be collected once. Collecting Tickets is the player's overall goal, as Tickets can be used to permanently unlock power-ups or cosmetic skins.

Earning a Ticket for Completing a Gameplay Bite
While the overall structure of the two currency system worked well from the start and survived unchanged until release, choosing the player's available rewards, their cost, as well communicating the existence of those rewards to the player proved to be a challenge throughout production.
At first, the main item that could be bought with Tickets were skins that included new models. This was too much of a burden on the art team, as they couldn't spare the time to create all new animations and textures for these skins with the time they had. While the art team was ultimately able to create great re-texture skins, these skins weren't enough motivation for the player to collect Tickets.
Eventually, I decided to have power-ups unlocked through Tickets at shops. With the player receiving both power-ups and skins from Tickets they were finally motivated to collect them, but I had to make sure the prices in and placement of the shop guided the player appropriately. For this reason, I set the prices of power-ups individually, making the easier to use power-ups cheaper than their more advanced counterparts. I also made skins more expensive than power-ups because power-ups are one of best parts of the game, and a player who ignored them in favor of skins would have a worse experience than one who didn't.

Ticket Prices of Skins - Those Without a Cost Are Earned Through Arenas and Exploration
I also worked with the team to consistently guide the player towards the shops. I worked with the Art team to make sure that the shop model was textured with a bright, contrasting color that would stand out in every region. I made the decision to place all respawn points inside shops, so players who die are reminded that they can use their Tickets and Coins to buy things. I worked with the Programming team to create a UI banner that reminds the player that they can buy a power-up whenever they collect enough Tickets to purchase a power-up they have not yet unlocked. I worked with the Level Design team to incorporate shops and power-up unlocking into the tutorial. These efforts paid off, and in our final milestones, all playertesters unlocked engaged with the reward system consistently.

Final Shop Visual Design

Simplified Power-Up Shop in Tutorial

Simplified Coin Shop in Tutorial